Ferrero Rocher Inspired Cupcakes

Ferrero cupcakes 1

Being a chocoholic, of course I have to try a number of recipes including chocolate :) My favorite kind of chocolate is dark chocolate, but these little guys called Ferrero Rocher might be the next best thing. If you have never tried these chocolates, you should, like right now. They are AMAZING!!! They have different layers with different textures and all of it is a combination of chocolate with hazelnuts (yummy right?) Anyway, I decided that I should do my own version of a Ferrero Rocher Cupcake! And so I took the main ingredients: chocolate and hazelnut and then had a lightbulb moment, Nutella! After all Nutella is chocolate and hazelnuts, so perfect! I decided to bake a brown sugar hazelnut based cupcake topped with Nutella buttercream, insert some more Nutella and put a Ferrero Rocher chocolate on top :) So here it goes I hope you like it as much as I did. So let’s get started, you will need the following ingredients:

Brown sugar hazelnut cupcakes

1/4 cup of hazelnuts (you can actually use any nut you’d like)

1 tbsp of white sugar

3/4 cup of flour

1 tsp of baking powder

1/8 tsp of salt

1/4 cup of low-fat yogurt (plain or vanilla)

1/4 cup of whole milk

1/2 tsp of vanilla extract

3 tbsp of unsalted butter @ room temperature

1/2 cup of brown sugar

1 egg @ room temperature

1. Preheat oven at 350°F and line a cupcake pan with 8 cupcake liners.

2. Using a chopper (I recommend the Topper Chopper from Prepara Kitchen Tools) chop the hazelnuts and white sugar together and put at the bottom of each cupcake liner.

3. In a bowl sift the flour, baking powder and salt and set aside.

4. In another bowl whisk yogurt, milk and vanilla extract and set aside.

5. In a mixer with the paddle attachment, cream the butter and brown sugar at medium speed for a few minutes.

6. Add the egg and mix well.

7. Add half the flour mixture and mix, then all of the yogurt mixture and mix and finally the rest of the flour mixture and mix well.

8. Pour the batter 3/4 of the way for each cupcake.

9. Bake for about 20-25 minutes.

Adapted from Raspberry Eggplant

Now before going on to the buttercream, we will fill the cupcakes with some Nutella! There are special tools to do this, but I simply use the wider side of the decorating tip like this:

Ferrero cupcakes  2

After taking the dough out you can pour some delicious Nutella.

Nutella Buttercream

1/2 cup of unsalted butter (softened)

7.5 oz of Nutella

pinch of salt

1/2 tbsp of clear vanilla extract

340 g (12 oz) of powdered sugar

3-5 tbsp of heavy cream

1. In a mixer with the whisk attachment, mix the butter and Nutella well.

2. Slowly add the powdered sugar, mixing after each addition.

3. Add salt, vanilla extract and 3 tbsp of heavy cream on low speed and then mix well.

4. Add additional heavy cream (one tbsp at a time) if needed.

Adapted from My Baking Addiction 

There you go, now decorate each cupcake with the buttercream and to finish it off put a Ferrero Rocher chocolate on top! This cupcake was delicious and had different layers just like the chocolate it was inspired after, see for yourself:

Ferrero cupcakes 3

From bottom to top:

– Crunchy hazelnuts layer

– Soft Brown Sugar cupcake

-Creamy Nutella filling

– Delicious Nutella buttercream

– Amazing Ferrero Rocher chocolate

Enjoy with a tall glass of cold milk!

Hope you enjoyed this recipe :)

New Year’s Double Orange Cupcakes!!!

Orange cupcakes

I know it’s a little too late for New Year’s but it is never too late to post this delicious double orange cupcake recipe! But first let me tell you the wonderful traditions we have here in Ecuador for New Year’s. Our foremost tradition is “Quemar el Viejo” or “To burn the old”. But it doesn’t necessarily mean that we burn someone lol Basically we create or buy nowadays, these dolls made out of newspaper and old clothes and we disguise them as someone famous or even someone from your family that you think they’re ready to “burn”. We also eat 12 grapes right before midnight, we wear yellow underpants for good luck, we travel around our block with our suitcase so that we are able to travel that year, we put money on our left shoe so that we have money the next year. Anyways we do a lot more, but these are the most important ones. So without further a do, this year (2014) I decided to make some orange cupcakes with orange frosting :) I decided to do this recipe because my family’s last name is Naranjo, which means orange tree. So Happy New Year’s from the Naranjo Family with an Orange Cupcake! :D

Let’s get started, you will need the following ingredients:

Ingredients orange cupcakes

Orange cupcakes 

2 cups of flour

4 eggs

1/2 cup of oil

1 cup of white sugar

1 tall glass of pure fresh orange juice

2 tbsp of baking powder

1 tsp of vanilla

1 tsp of orange zest

1. Preheat oven at 350°F. Line a cupcake pan with cupcake liners.

2. Mix the flour with the baking powder and set aside.

3. With a hand-held mixer, blend the eggs with the sugar until creamy and then add the oil slowly.

4. Add the vanilla and mix then add little by little the flour and mix.

5. Add the orange juice and mix, then finally add the orange zest and mix.

5. Put them in the designated molds by filling the cake pan or each individual cupcake 3/4 of the way. 

6. Bake for about 25 minutes. The cupcakes will come out looking like this: 

Orange cupcakes 1

Orange Frosting

Ingredients Orange Frosting

3 tbsp of unsalted butter (softened)

2 1/4 cups of powdered sugar

3 tbsp of orange juice

1 tsp of orange zest

1. Using a mixer with the whisk attachment, mix the butter until creamy.

2. Slowly start to add the powdered sugar.

3. Then add the orange juice (mixing after adding each tbsp) and the orange zest.

4. Finally add some orange food coloring if desired.

Adapted from Baked by Rachel

Decorate each cupcake any way you would like with the frosting and voilà!

Hope you enjoyed this recipe :)

Christmas Cupcakes

Christmas cupcakes

Sooo another Christmas post! lol I know we are way past the Christmas season but it can’t hurt to post these beautiful Christmas tree cupcakes :) I spotted these all over pinterest for Christmas. Each one had something unique about them, so I decided to try my own version :) They turned out really delicious and my little cousins really loved them. Specially Cami, so this post goes out for her ♥. Let’s get started!

These cupcakes are actually not a new recipe, I recycled my delicious Carrot Cupcakes and used my go to buttercream frosting (you can get the recipe from my previous post Cupcakes & Popcakes for a Quinceañera ♥ ). So what’s new in this post? Well I will show you my trick to keep the frosting standing nice and tall so it actually looks like a tree! I’ve seen a couple other tricks to do this. Some of them include a merengue base or a dulce de leche base. But I said to myself merengue or dulce de leche with frosting? That sounds too sweet for my taste and I’m actually a sweet tooth :D So instead I used … a strawberry! Yes a strawberry and it was the smartest decision because you can eat the frosting with the strawberry and it tastes like strawberries and cream! So here I will show step by step how I did it.

Christmas cupcakes 1

1. Have your carrot cupcake ready (remember it should be completely cool). Also you might want to have an easy to clean station.

Christmas cupcakes 2

2. Using a pastry bag and a 1M star tip with your frosting ready, drop just a little star on the middle of the cupcake.

Christmas cupcakes 3

3. Next put the strawberry right on top of the frosting star. Make sure the strawberry is not wet and it is as fresh as possible.

Christmas cupcakes 4

4. With your bag ready, start frosting around the strawberry as you work your way to the top.

Christmas cupcakes 5

5. Here is the almost finished product with your strawberry covered completely with frosting yum!

Christmas cupcakes 6

6. And then to finish it off go ahead and add some nice decorations. I went and added some silver spherical sprinkles and a heart at the top :)

I served these cupcakes as dessert for Christmas dinner and they were a total hit! But also I gave some of them away as Christmas gifts :) I put them in this nice red box my grandma bought me a while ago and they looked beautiful! Tip: you might want to prepare these the day you will be eating them and if not definitively keep them in the fridge.

Christmas cupcakes box

So these cupcake boxes were only one of the DIY gifts I made. Why not show you the other gifts :) For my aunts and grandmas in my family I was thinking something personal that they can enjoy and relax with. So I did some lavender sugar scrubs!

Lavender Sugar Scrub

 Lavender Sugar Scrub

Now for all my cousins (I have a lot from my mom’s side) I wanted to give them something personalized but also delicious. And I found this great tutorial on how to do personalized mugs with their initials! Plus I added some delicious sugar cookies I made in my previous post Christmas Cookies

Personalized mug

Personalized Mugs

Now this wasn’t a gift but I would like to show you our Christmas dinner table :)

Christmas dinner

Everything was delicious! Grandma made a potato salad, yellow rice, fruit salad, of course the turkey, and turkey dressing! You can also see my cupcakes on the far right :) And last but not least I will share the mulled wine recipe I found and it is absolutely to die for! (you can see it on the far left). For this recipe you will need the following ingredients:

1 liter of red wine (you can use the one that comes in a box, no need for a fancy wine)

4 cloves

1 cinnamon stick

4 sweet black peppers

2 star anise

2 oranges cut in slices

1/4 cup of brown sugar

1. In a small pot pour 1 cup of red wine with the cloves, cinnamon, sweet black peppers, star anise and sugar and let boil for 8 minutes.

2. Incorporate the rest of the red wine and let boil for another 5 minutes.

3. Meanwhile cover the top of each wine glass with an orange wedge so it will be wet and white sugar will stick to it. Also put half an orange slice on each glass.

4. Pour the wine and it is ready to drink!

And to finish off with Christmas :) here is a picture of my Christmas tree! Wish y’all had a happy holiday :)

Christmas tree

Hope you enjoyed the recipes!

Christmas Cookies

Christmas baston cookies 2

Hello once again! Sorry for this very late post on Christmas but I was so busy during the holidays preparing sweet treats, that I completely forgot to post these incredible cookies :) Also it’s 2015 so Happy New Year! Later I will post the cupcakes that I made for New Year’s Eve! Anyhow I made two types of christmas cookies, you will see the other ones below but let’s start with these candy cane looking cookies! You will need the following ingredients:

3 cups of flour

1 tsp of baking powder

1 cup of unsalted butter

1 cup of sugar

1 egg

1 tsp of vanilla extract

1. Mix the flour and baking powder and put them in a bowl.

2. Using an electric mixer with the paddle attachment, beat the butter (better at room temperature) and sugar until creamy.

3. Add the egg and vanilla extract and mix.

4. Add the flour mixture slowly and mix until it forms an uniform dough and it starts to attach completely to the paddle.

5. Split the dough in two parts once it’s firm. Take the first half and knead it with your hands a couple of times.

6. Leave the second half in the mixer and add some food coloring (I added about 3 drops of red food coloring) and mix until all the color is incorporated. Then knead it with your hands a couple of times.

7. Then put both doughs in separate ziplock bags and refrigerate for about 2 hours.

8. Take the first half out of the fridge and separate it into 5 parts (For the next step you are going to need a long working station covered with Silpats or some flour on the counter so that the dough doesn’t stick).

9. Roll each section so that it forms a long string (make sure they are not too thin or they will break).

10. Repeat steps 8 & 9 with the red dough.

11. Once you have long strings from both doughs, take one from each and twist them so they form a rope. Cut the long twisted rope into smaller pieces so that you can bend them so they will look like candy canes.

12. Place them in a baking sheet with a Silpat, they will look like this:

Christmas baston cookies 1

13. Bake the cookies in the oven at 177° C ( 350°F) for 10 minutes. 

There you go some festive cookies that taste delicious!

Sugar cookie recipe adapted from Glorious Treats 

Now the other cookies I made looked amazing! I call them swirl christmas cookies. But you can actually use any other colors and bake them for any occasion :) You will need the following ingredients:

2 cups of flour

1/2 tsp of baking powder

1/4 tsp of salt

2/3 cups of powdered sugar

1/4 cup of white sugar

1 1/4 cups of unsalted butter

1 tsp of vanilla extract

1/2 tsp of almond extract (you can use any extract you’d like)

1/2 tsp of green food coloring (you can use any color you’d like)

2 tbsp of flour

1 1/2 cups of christmas red and green sprinkles (again you can use any color you’d like).

Note: the original recipe uses a food processor to make these, but I used my KitchenAid mixer and it worked! Although, I did take the butter right out of the fridge like a minute before I was going to use it and I didn’t over mix the dough.

1. Mix all the dry ingredients in the mixer: flour, baking powder, salt, powdered sugar and white sugar.

2. Add the butter (right out of the fridge and chopped into little cubes) and mix until the mixture looks like cornmeal:

Christmas swirl cookies 1

3. Add the vanilla extract and mix until the dough forms a ball:

Christmas swirl cookies 2

4. Split the dough in two parts. Leave the first half in the mixer and add the almond extract, the green food coloring and the 2 extra tbsp of flour and mix until it forms an uniform dough.

5. Roll each dough between two sheets of waxed paper so it forms a rectangle and refrigerate both doughs for at least 2 hours. They should look like this:

Christmas swirl cookies 3

6. Meanwhile pour the sprinkles into a rectangular dish:

Christmas swirl cookies 4

7. Take out both doughs and take off one piece of waxed paper from both. Lightly brush one of the doughs with a little bit of water and place the other dough on top. Be sure that both doughs are stuck together and that their edges are even (you might want to trim them a bit).

8. Throw away the other waxed paper from only one dough and roll both doughs so they form a log.

9. Once you have your log, take away the last waxed paper and place the dough into the dish with sprinkles. Roll the log so that every part is covered with sprinkles:

Christmas swirl cookies 5

10. Wrap the log in clear plastic and place in the fridge for about 4 hours.

11. Take the log out, take off the clear plastic and slice it into 1/4 inch (0.6 cm) thick cookies and place them on a baking sheet with a Silpat.

12. Bake the cookies in the oven at 163° C ( 325°F) for 15 minutes.

Adapted from Sprinkle Bakes

There you go! Colorful and delicious cookies for Christmas. Kids will love these :)

Hope you enjoyed this recipe :)

Torta di Mele

Apple pie

It’s Apple Pie time! I’ve been wanting to make this for a very long time now. Actually my dad has been pushing me to make this pie as well. So I finally decided to do it :) And let me tell you, it took some work but the result is sooo delicious! I took this recipe from one of my favorite recipe books Torte E Crostate (which is mentioned previously in my other post Crostata de Pere e Mandorle). I will say  that I adapted the recipe a bit and it turned out pretty good! So let’s get started.

First you will need to make the dough. For this recipe I made pasta brisée (pastry crust) from scratch (you can do this by hand or you can use a KitchenAid mixer). You will need the following ingredients for the dough:

400 g (14 oz) of white flour

250 g (8.8 oz) of cold butter without salt chopped into little cubes

7 tbsp of really cold water

pinch of salt

By Hand 

1. Mix flour, and salt in a large bowl.

2. With the tip of your fingers incorporate the butter (do not melt it but make sure it is not that hard) until you form crumbs.

3. Add the water and mix with a spatula. Taking the dough to the edges of the bowl, until it forms an uniform dough.

With KitchenAid mixer  

1. Add flour and salt and stir. Then incorporate the butter and mix at medium speed until it forms crumbs.

2. Add the water and mix at high speed. It should form an uniform dough.

3. Roll the dough so it forms a circle and wrap it in clear plastic and leave it in the fridge for about 30 minutes.

4. Meanwhile spread butter on a 28 cm (11 inches) round tart pan with a loose bottom. Tip: to make sure the dough doesn’t stick to the pan, I use PAM’s butter flavor cooking spray and add a little bit of flour on top.

5. Once the dough comes out divide it in half. Roll the first half  to form a 33 cm (13 inches) circle and wrap it in clear plastic and put it back in the fridge until it’s ready to use.

6. Roll the other half as well to form a 28 cm (11 inches) circle and put it in the pan and back to the fridge for about 30 minutes.

Now the base of the your pastry crust is ready! Now let’s do the filling. For this you will need the following ingredients:

Apple pie ingredients

7 apples (I used green but I would recommend red, they’re sweeter)

150 g of (5.3 oz) of white sugar

1 1/2 tbsp of orange or lemon juice

3 tbsp of white flour

1 tsp of cinnamon

3 tbsp of milk

Now this is where I changed the original recipe a bit. Instead of just using this filling. I included a little bit of the almond based filling used in my previous post Crostata de Pere e MandorleYou can get the ingredients and step by step in the link. But for the other apple based filling, here are the following steps (it’s super easy):

1. Peel the apples and cut them into slices.

2. In a bowl add the apple slices, the sugar, the orange/lemon juice, flour and cinnamon.

3. Distribute the almond based filling first and then the apple based filling on top. It should look like this:

Apple pie 1

4. Now comes the hard work. It’s really not that hard, but it takes a lot of patience.

5. Take out the remaining dough from the fridge and you are going to cut the dough into long strips about 2 cm thick. Tip: to do this I used a pizza slicer and a ruler to accurately measure 2 cm. Before you cut it it will look like this:

Apple pie dough

6. One strip at a time you will want to create a pattern throughout the pie. In my case I did on top and on bottom horizontally and vertically for every strip (it took me a while but I had fun doing it).

7. Bake the pie in the oven at 190° C ( 375°F) for 30-40 minutes.

It’s ready you can enjoy your dessert warm or at room temperature. I served mine warm with some vanilla ice cream on top! Total success, everyone loved it!

Hope you enjoyed this recipe!

Cupcakes & Popcakes for a Quinceañera ♥

15 cupcakes

 On a very special day, December 3rd, my cousin Dennise turned 15 :) For us when a girl turns 15 is a very special occasion. We have many traditions, that unfortunately have been lost throughout the generations but we still maintain the most important one of all. This is the time when you transition from being a girl to the women you will become. It is very important to share this time with your family. But what a better way to do this than with a fancy family reunion :) And so my aunt asked me if I could help out, and I gladly said yes!

To start with I helped with some party decorations including: tin can lanterns, the number 15 made out of foam board, fiber paper pom-poms and shiny crepe paper fans. Here are some pictures of how they turned out and below each picture there is a link to where you can find the tutorials I used to make these.
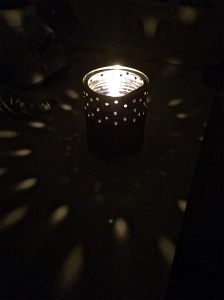
15 can lantern

Tin Can Lanterns 

15 number

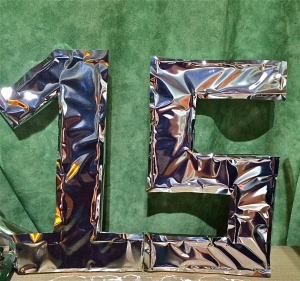
There is no tutorial for these since I made them myself with a little imagination and some extra material on hand. I used a big foam board that I cut in the shape of a number 1 and a number 5 with a snap-off knife. Then I covered them in shiny paper to go with the colors of the party and there you go! I must admit it took some time to make these but at the end they turned out so pretty :)

15 pom-poms

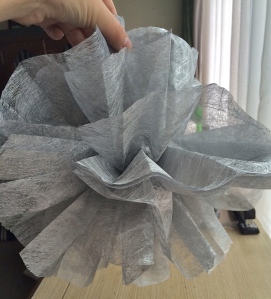
Fiber paper pom-poms

15 fan

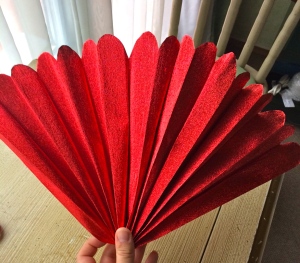
I made these as well! I used shiny crepe paper and started to fold them the same way you make the beginning of the pom-poms but instead of opening them up so they form a ball. I just decided to open them up to form a fan and voilà! Super easy decoration.

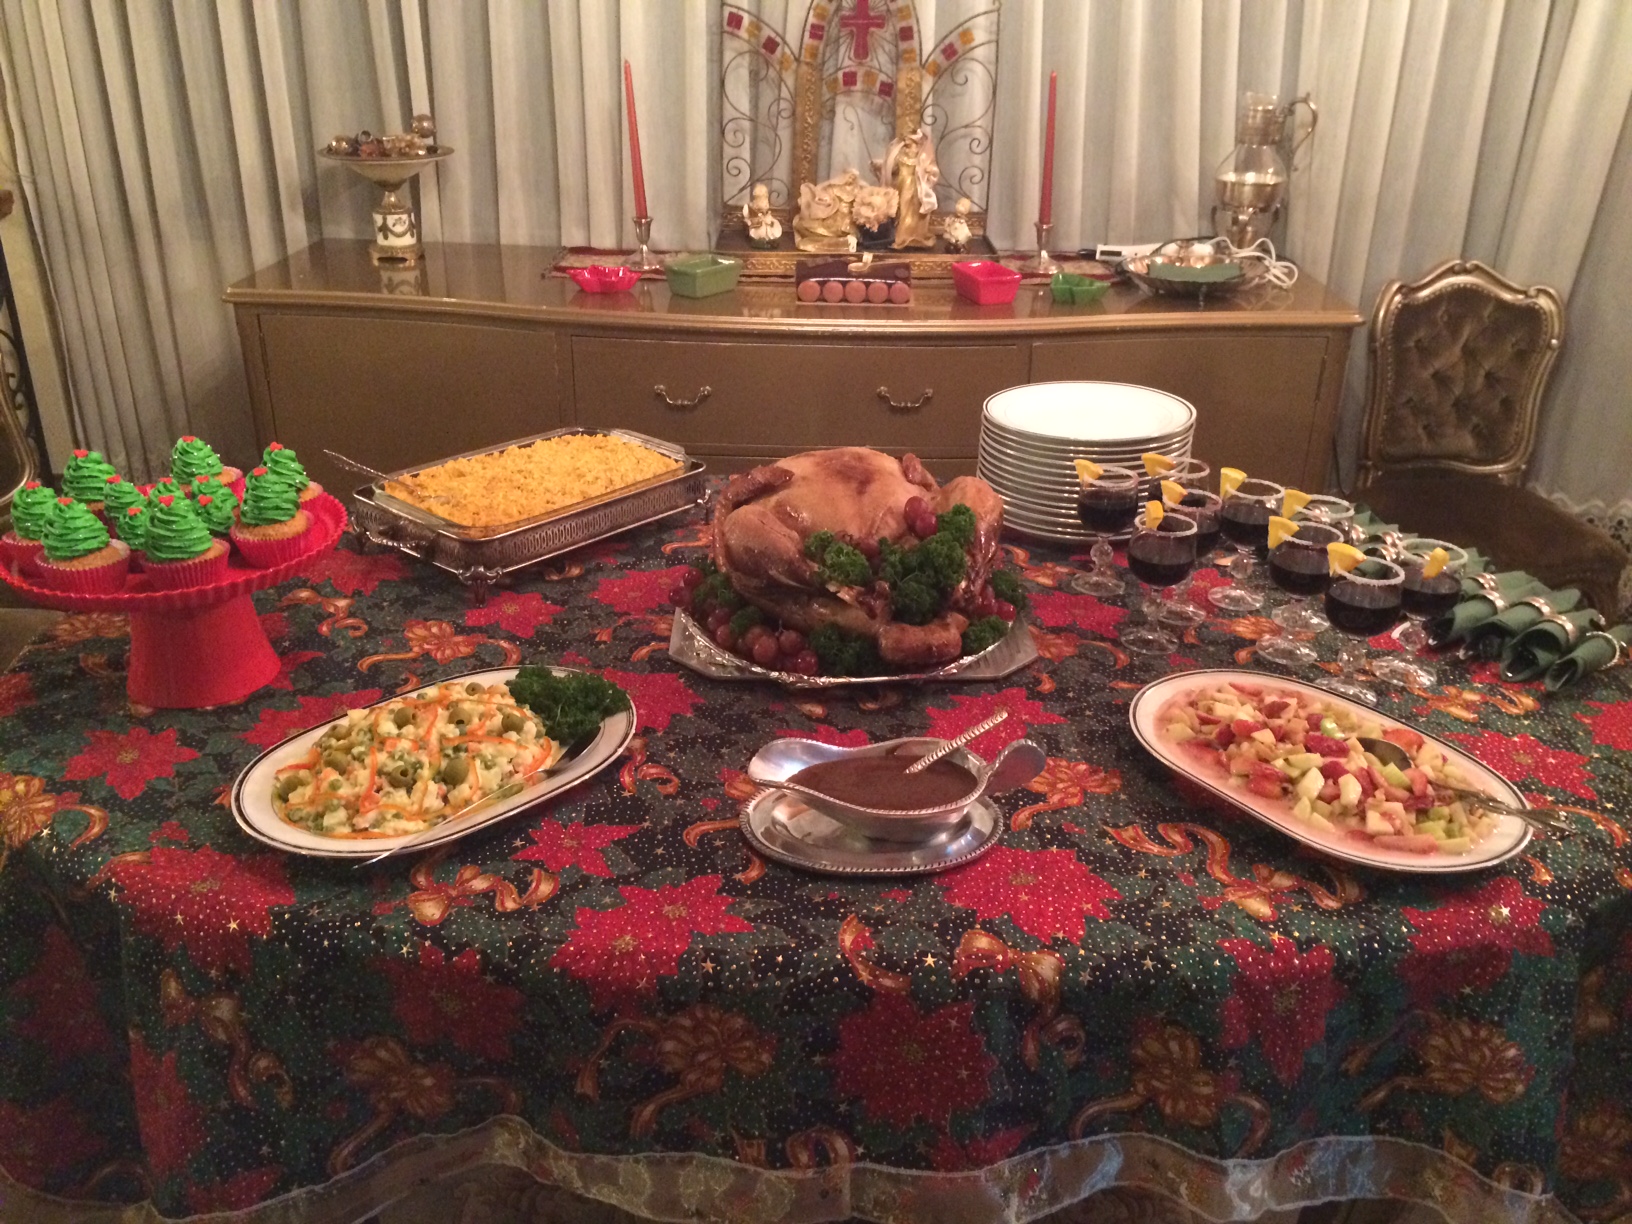
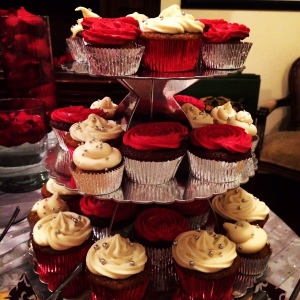
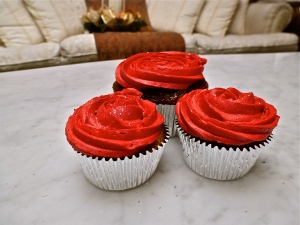
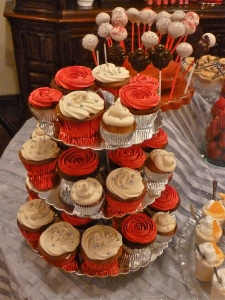
Then of course I prepared some sweets for the dessert table :) These included: chocolate cupcakes with red buttercream frosting, pumpkin cupcakes with maple cream cheese frosting, mini carrot cupcakes with maple cream cheese frosting, chocolate cupcake lollipops and I couldn’t leave behind red velvet popcakes!

Nis 15.1

Nis 15.2

15 popcakes

So finally here are the delicious recipes:

For the chocolate cupcakes I once again used my go to recipe featured on my previous post Mmmm It Smells Like Chocolate  For the buttercream frosting I used the following ingredients:

1 cup of unsalted butter

1/4 teaspoon of salt

2-4 cups of powdered sugar

1 teaspoon of vanilla extract

2-3 tablespoons of heavy cream

red food coloring

* The amount of cups of powdered sugar really depends on how stiff you want the buttercream to be and how sweet you want it to be. For my frosting I used only 3 cups of powdered sugar because I didn’t want the frosting to be so stiff or sweet. That way I could swirl the frosting into a rose more easily.

1. Beat the butter (better if cold, I took mine out of the fridge just a few minutes before) in the mixer with the whisk attachment on medium speed for about 30 seconds until smooth.

2. Add salt and mix.

3. One cup at a time add the powdered sugar and beat after. Here I added only two cups first. If this is sweet and stiff enough for you then stop with the powdered sugar after this.

4. Add the vanilla extract and mix.

5. Add one tablespoon of heavy cream and mix. Determine if your frosting is stiff and sweet enough. If it is too stiff add another tablespoon of heavy cream or if it is too liquid then add another cup of powdered sugar like I did.

Adapted from Glorious Treats 

In order to decorate the cupcake like a rose (Hint: will be making some of these for Valentine’s day definitively) I highly recommend watching some tutorial videos on how to do this, they were really helpful! And finally I topped off the cupcakes with edible silver glitter!

For the pumpkin cupcakes I was inspired by this recipe I ran across the other day. As soon as I saw the recipe I thought why not make these? I was originally going to do some vanilla cupcakes but for this occasion a special recipe is required :) I used the following ingredients:

1 cup of flour

1 tsp of baking powder

1/2 tsp of baking soda

1/4 tsp of salt

1 tsp of cinnamon

1/2 tsp of ground ginger

1/2 tsp of ground allspice

1/4 tsp of nutmeg

1 cup of canned pumpkin puree

1 cup of sugar

1/2 cup of vegetable oil

2 eggs

1 tsp of vanilla extract

1. Preheat oven at 350°F. Line a cupcake pan with cupcake liners.

2. Combine the dry ingredients in a bowl: flour, baking powder, baking soda, salt, cinnamon, ground ginger, ground allspice and nutmeg.

3. Whisk together the pumpkin puree, sugar, oil, eggs and vanilla extract.

4. Add the dry mixture to the wet mixture and mix well.

5. Put the mixture in each individual cupcake by filling it 3/4 of the way.

6. Bake for about 25-30 minutes and voilà!

Adapted from Glorious Treats 

Now I had the cupcakes but I needed a nice and delicious topping. Fortunately for me the pumpkin recipe I found included a maple cream cheese frosting! I’ve never had or done this recipe so I thought why not? Let’s try it out. I used the following ingredients:

1/2 cup of unsalted butter

1 package of cream cheese (8 oz)

4 cups of powdered sugar

2 tbsp of maple syrup

1 tsp of clear vanilla extract

1 tbsp of heavy cream (optional)

1. In a mixer add butter until creamy (preferably use cold butter and cut it up in small cubes. Also use the whisk attachment).

2. Add the cream cheese and mix.

3. Add powdered sugar one cup at a time (I also kept tasting how sweet it was after each addition and the frosting consistency, you might not need the 4 cups necessarily).

4. Add maple syrup and vanilla extract while still mixing on low. And finally add heavy cream if the consistency you want requires it.

I decorated my pumpkin cupcakes with a more simple swirl technique and topped it off with silver spherical sprinkles.

Adapted from Glorious Treats

For the mini carrot cupcakes I used my special recipe featured on my previous post Carrot Cupcakes And for the frosting I used the same maple cream cheese frosting featured above.

The chocolate cupcake lollipops were really simple: just melted some dark chocolate and filled cupcake molds and let them cool. Easiest recipe for the party and equally delicious :)

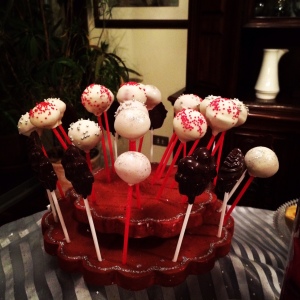
So one more recipe to go: red velvet popcakes! Since I bought my Babycakes Pop Maker. I’ve been inclined to do more popcakes and donut holes recipes. And since the party colors were red and silver, what a better idea than to do red velvet popcakes! So here are the ingredients I used:

1 1/4 cups of flour

1/4 tsp of salt

1 tbsp of cocoa

1/4 cup of unsalted butter

3/4 cup of sugar

1 egg

1 tsp of vanilla extract

1 tbsp of red coloring

1/2 cup of buttermilk

1/2 tsp of white vinegar

1/2 tsp of baking soda

1. Combine the dry ingredients: flour, salt and cocoa and mix.

2. In a mixer with the whisk attachment, beat butter (better if softened) and then add sugar and mix. Add eggs and vanilla extract and mix well.

3. Separately whisk the red food coloring with the buttermilk (to make some buttermilk mix 1 1/2 tsp of white vinegar or lemon juice into a measuring cup and fill with milk to 1/2 cup. Let stand 5-1o minutes).

4. Alternatively mix the flour mixture with the butter mixture in the mixer and then add the buttermilk mixture. Do this in 3 rounds beginning and ending by adding the flour mixture.

5. Mix the white vinegar and baking soda and allow to fzz. Fold into the mixture with a spatula.

6. Lightly coat the pop maker with oil spray and preheat the machine. Drop about a tablespoon of mixture into each hole and let it bake for about 5 minutes, test it with a toothpick and voilà!

7. Melt some white chocolate and insert a lollipop stick with some melted chocolate into each popcake. Let them cool in the fridge for about one hour.

8. Meanwhile melt some more white chocolate to coat the popcakes and top them off with red and silver sprinkles and edible silver glitter!

So there you go, tons of recipes for a very special occasion. It might have taken a while to prepare all of this (weeks of planning actually) but at the end it was so worth it and everything looked beautiful. One more thing, I dedicate this post to the birthday girl, my cousin Dennise who has entered a wonderful time of her life ♥

Pumpkin Donut Holes

Donut holes

This recipe reminds me of a fond memory with my friend Katherine :) I met Katherine while I was at college in Texas, she was my roommate freshman year and we became very close friends. So one weekend she took me fishing at Rockport, TX. That day we left early in the morning and on the way over we stopped to have some breakfast. In the store they served breakfast muffins, donuts and donut holes. And I remember Katherine asking me if I wanted some donut holes. But I had no idea what a donut hole was lol. So I decided to try some, and from that point on I became addicted to them! No but seriously. So this recipe that I found the other day combines two of my addictions (other than chocolate of course) donut holes and pumpkin!

I will dedicate this to my dear friend Katherine: without you I would have probably never discovered donut holes :) Let’s get started!

For this recipe you will need the following ingredients:

 Ingredientes donut holes

Dough

1 3/4 cups of white flour

1/2 teaspoon of cinnamon

1/2 teaspoon of nutmeg

1/2 teaspoon of ground allspice

1/8 teaspoon of ground cloves

2 teaspoons of baking powder

1/2 teaspoon of salt

3/4 cup of pumpkin puree (I recommend Libby’s 100% pure pumpkin)

1/2 cup of milk

1/2 cup of brown sugar

1/3 cup of vegetable oil

1 egg

1 teaspoon of vanilla extract

Cinnamon Sugar Coating

2 tablespoons of cinnamon

2/3 cup of white sugar

4 tablespoons of unsalted butter (melted)

For the coating feel free to adjust the recipe if you want more cinnamon or more sugar. Also you will probably need two batches of the coating to cover all the donut holes :)

1. Combine the dry ingredients: flour, cinnamon, nutmeg, ground allspice, ground cloves, baking powder and salt.

2. Whisk together pumpkin puree, milk, brown sugar, vegetable oil, egg and vanilla extract.

3. Combine the wet mixture with the dry ingredients and mix with a spatula.

Now to cook them I didn’t use an oven because recently I bought this incredible cake pop/donut hole machine. You can find it at amazon it’s called Babycakes Pop Maker, it’s really nice and inexpensive purple machine that will make 12 cake pops. At the time I bought it, I believe it was on sale so I got for about $20, which was a pretty good deal.

4. So the machine has special instructions in the manual. But basically once you preheat the pop maker you lightly coat it with oil spray and drop about a tablespoon of dough into each hole and let it bake for about 5 minutes, test it with a toothpick and its done!

5. Combine cinnamon and sugar for the coating.

6. Let the donut holes cool for about 2 minutes and then dip them in the melted butter and coat them with the cinnamon/sugar mixture.

And there you go :) These are definitively within my top desserts. They are so yummy and really easy to make.

Hope you enjoyed this recipe :)

Adapted from Damn Delicious

Carrot Cupcakes :)

Carrot cupcakes

I don’t know why I’ve been waiting to make this recipe as it is one of my favorites! There is a lot of different versions of carrot cupcakes, but this was my mom’s special recipe so I like it the best :) I often make this as a cake or as cupcakes it depends on the situation. But these right here were for a special occasion. My boyfriend’s brother turned 18 and just like me he is a sweet tooth and loves these cupcakes and so I decided what a better gift than these cupcakes topped off with delicious cream cheese frosting! So let’s get started, you will need the following ingredients:

Carrot cupcakes

3 cups of white flour

1 teaspoon of nutmeg

pinch of salt

3 teaspoons of cinnamon

1/2 teaspoon of baking powder

1/2 teaspoon of baking soda

3 eggs

2 cups of white sugar

1 cup of vegetable oil

2 cups of carrots

1 cup of nuts *optional

2 cups of raisins *optional

The last two ingredients I actually never use but my mom’s original recipe has them so you can give it a try :)

1. Preheat oven at 350°F. Grease a cake mold with butter or line a cupcake pan with cupcake liners.

2. Mix all the dry ingredients: flour, nutmeg, salt, cinnamon, baking powder, baking soda and sugar.

3. Mix the eggs with an electric mixer until they become fluffy.

4. Slowly add the vegetable oil to the eggs and mix well.

5. Add the dry ingredients to the wet mixture and mix well.

6. Grate enough carrots to have 2 cups and then add them to the mix with a spoon.

7. If you decide to use nuts and raisins add them to the mix.

8. Put them in the designated molds by filling the cake pan or each individual cupcake 3/4 of the way. They will look like this:

Pre carrot cupcakes

Notice that the top cupcakes at the left corner have a toothpick in them. Well that is because my aunt’s dog Tea loves carrots and she loves these cupcakes. However, these are specially made for her because I didn’t include any sugar :)

9. Bake for about 45 minutes if you are baking the cake and no more than 30 minutes for cupcakes. The cupcakes will come out looking like this:

Post carrot cupcakes

Cream cheese frosting

2 packages of Philadelphia’s 8 oz cream cheese

1/2 cup of unsalted butter

2 cups of powdered sugar

1 teaspoon of vanilla extract

Tip: it is better to do this frosting either before you bake the cupcakes or after the kitchen is cool enough.

1. Mix the cream cheese and butter in a mixer.

2. Add the vanilla extract (if you want the frosting to be whiter, then use clear vanilla extract).

3. Add the powdered sugar and mix well.

Finally decorate the cake or each cupcake with any technique you’d like and voila!

Hope you enjoyed this recipe :)

Crumble Aux Fruits

Crumble aux fruits

Crumble aux fruits! I absolutely love this recipe for so many reasons. One of them is the fact that the recipe includes any fruit you’d like. Since the recipe calls for jam and actual fruit, you can make endless combinations! For example, I have made blackberry jam with apples, strawberry jam with peaches and this current recipe here has peach jam with peaches :p But most importantly I adore this recipe because it reminds me of my wonderful and adventurous time in France.

I learned this recipe from my uncle who lives in Nantes, France. While I was there he cooked for me so many delicious meals, but obviously me being a sweet tooth, this one was my favorite! Besides it is not hard to do at all and takes just a couple minutes :) So let’s get started.

For this recipe you will need the following ingredients:

Ingredientes crumble

4 peaches

juice from half a lemon

125 g (4.4 oz) of white flour

100 g (3.5 oz) of unsalted butter

75 g (2.6 oz) of brown sugar

3 tablespoons of peach jam

1/2 teaspoon of cinnamon

pinch of salt

Here both the jam and the fruit are peach, but don’t be afraid to combine different fruit jams with other fruits :)

1. Preheat oven at 200° C (392° F). Grease the cupcake molds with a little butter.

2. Cut peaches in thin slices and put them in the cupcake mold. Add lemon juice.

3. On top put the jam.

Now we need to create the crumb which should look like this:

Crumb crumble

4. Mix the butter (better if soft, you can put it for 15 seconds in the microwave), flour, salt, sugar and cinnamon with a spoon until it forms a crumb.

5. Place the crumb on top of everything and bake for about 30 minutes.

Now it is ready to enjoy warm or at room temperature. You can also enjoy this recipe with some vanilla ice cream on top!

Hope you enjoyed this recipe!